Wednesday 17 February 2016
Tuesday 16 February 2016
ARCHERY
Adventist Youth Honors Answer Book/Recreation/Archery
| Archery | ||
|---|---|---|
| Recreation General Conference See also Archery - Advanced |
Skill Level 1 |  |
| Year of Introduction: 1945 | ||
|
The Archery Honor is a component of the Sportsman Master Award . |
1. Identify the parts of a bow.
2. Identify the parts of an arrow.
Nock, index, index or "cock" feather, hen feathers, shaft, spine, crest, point-tip-pile.3. Name and explain the safety rules for archery.
- Don't shoot straight up.
- Never run on the archery range.
- Approach the target from the side, not the front so you don't get poked by the arrows sticking out of the target.
- Be sure your equipment is in good working order.
- Be aware of who is around you at all times.
- Don't "hide" behind the target.
- Don't walk in front of another archer.
- Don't talk on the shooting line.
- While loading your bow be sure that the arrows are always pointing toward the target.
4. Correctly and safely string a bow.
There are three basic ways of stringing and unstringing a bow. Two of them are safe, and one is not. The unsafe method is also presented because it is very commonly practiced. It is presented here so that you can recognize when another person is using it, and by so doing, placing himself at risk. If you see someone using this method, please educate them.1. Bow Stringer

Another Bow Stringer
2. Step through
In this method; the archer begins by placing one end of the string into the string notch on the lower limb of the bow. The archer then "steps into" the bow by placing the right leg between the bow and the string, locking the bottom limb of the bow around the right calf and foot. The bow's belly should be to the archer's left, and the bottom tip should rest against the left side of the archer's right foot. The outside of the right knee will then be in a position to brace the bow near its handle. As the right hand is used to flex the bow and the left hand is used to loop the string around the upper string notch. This method can damage your bow if done incorrectly. This is the least favored way of the 3 stringing options.
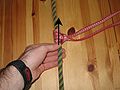
Push Pull

The "Push Pull" method
The bow is placed as shown in the picture. The bottom "bow nock" will be up against the instep of the shoe. By pushing with the palm of the top hand and pulling with the bottom hand the bow is bent. The fingers of the top hand pluck the string on or off.
Always Check the String

Checking the String
5. Describe and show how to use the following:
a. Arm guard
Armguard
b. Finger tab or glove

Finger tab
There are several types of finger tabs available. The "Marshall" style has one hole and the "Western" style has two holes. Either one works fine. They should be trimmed to fit the archer.
The "archers glove" covers the finger tips and secures around the archer's wrist.
c. Quiver
A quiver by definition is "anything that holds arrows". There are several types of quivers including:- The side quiver which hangs from a belt
- The back quiver which hangs from the shoulder.
- The side quiver which hooks onto a pocket.
- The pocket quiver.
- The ground quiver which sits on the ground.
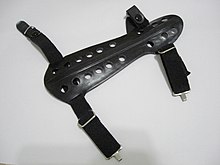
d. Bow sling
The purpose of a bow sling is to keep you from dropping your bow. There are two types of bow slings: the wrist sling and the finger sling.A wrist sling is a strap that is connected to your bow for you to put your hand through while gripping your bow.
A finger sling is a 2 inch string with a loop at each end. After gripping your bow the loops go over the thumb and your index finger.
e. String kisser
The string "kisser" is a point on the string that touches your lip or corner of your mouth.If you are using a "center draw" (see, Anchor) the string is in the middle or your chin and the middle of your nose. A "kisser" would be a small disc on the string that would touch your lip. This assures a vertical alignment of your bow.
Creative Idea: Use a foldable to record / organize this information. Go here http://www.youtube.com/watch?v=b6K0RnlNM7E to learn how.
6. Demonstrate the following shooting techniques:
a. The stance

Proper archery stance
Setting your feet is the first step in setting up a good shot. A good foundation is important in anything, especially in archery.
First, lay an arrow pointing toward your target and perpendicular to the shooting line. Second, place your feet straddling the shooting line with your toes slightly touching the arrow.
Your feet should be placed approximately the same distance apart as your shoulders as a starting point. Once you find a comfortable stance it is important to remember where to put your feet each time you return to the shooting line.
b. Nocking the arrow
To place an arrow on the bowstring. The attachment to the rear of an arrow which is placed on the bowstring and holds the arrow on the string.There are two ways to put and arrow on the string. One is right and one is wrong. The index feather or "cock" feather should point away from the bow. This feather is usually a different color than the other two which are also known as "hen" feathers. Doing this allows the hen feathers to gracefully clear the bow. If the "index" feather is pointed toward the bow it will kick out away from the bow as it tries to clear the bow during the shot.
The picture shows the most common way of placing the fingers on the string. The thumb and small finger should not be involved in the shot in any way or fashion. they should be relaxed and folded down as if you were saying "I'm THREE years old".
After nocking the arrow, place three fingers on the string. Two under the arrow and 1 over the arrow then slide them together, lightly touching the arrow. The string should be at the first joint near the end of your fingers. This is a starting point. Competitive archers try to get the string at the very end of their fingers for a quicker release but this takes years of training.
c. The draw
This is the act of pulling the string back. The archer should start with the bow arm pointed directly at the target before pulling the string. Some young archers like to pull the string while raising their bows but this is a waste of energy and creates fatigue while shooting. Be very deliberate with little wasted motion.d. The anchor

The Side Draw

The Center Draw
The "anchor" is a combination of points to which the bowstring and/or the index finger of the drawing hand are drawn to on the face and neck. There are multiple ways of "Anchoring" the string after you have drawn the bow. I will give you the two most common ones.
The Side Draw: Hunter or Field Style - Pull the string back so the index finger of your string hand touches the corner of your mouth. This places the arrow directly beneath the eye that you are aiming with. This is recommended for all beginners. As archers continue to progress and put an aiming device on their bow they can progress to the next one.
The Center Draw: Target or Olympic Style - Pull the string hand under your jaw so the string is in the middle and in front of the chin. The string should also touch the nose. The string hand is in line with and directly under the jaw bone. The above picture is my oldest son Mark, Jr who is currently training for the Olympics.
Remember that anchoring in the same place and the same way every time is critical no matter how you choose to anchor.
e. The hold and aim

Hold and Aim
Hold means to get everything locked into place and be sure that you are ready to release the arrow. There should be a straight line from the back elbow right through the arrow to the back of the bow (see photo).
Aim is the process of deciding when to let go of the string. An archer without a sight uses an "instinctive" method or guessing how high or low to aim.
A sight is a reference point for aiming but is only useful if the archers shoots the same way every time.
An archer without a sight can use a sighting method called "point of aim". Contact me at West's Archery and I can teach you how to use this.
f. The release

The Release
The release is the most important part of the shot. It is when everything comes together in a fraction of a second. The best way to perform the release is to just relax the fingers. As the arrow goes toward the target, the string hand should go in exactly the opposite direction. My Youngest son, Aaron, is demonstrating this in the photo.
g. The follow-through

Follow-through
Once the archer has released the arrow, nothing should move. The archer must give the arrow time to clear the bow. To insure this, instruct your archers to wait until the arrow hits the target before moving at all. In the picture you can see that my release hand goes in the exact opposite direction as the arrow. Making sure that your shoulders don't collapse is very important. Also, notice that I am still aiming, long after the arrow is gone.
7. Why is it necessary to have an arrow "nocking point" properly positioned on the bow string?
If the nocking point is too high, the arrow will be pointed "down" and come out of the bow low.If the nocking point is too low, the arrow will be pointed "up" and come out of the bow high.
Nock rings can be placed on the bow to allow for consistency. A bow square and nock pliers can be used to set the nocking point properly.
8. Using a standard (Olympic bow) score one of the following:
a. Indoors: 30 arrows (5 rounds) at 18 meters score 50 points on a 60 cm. target.
b. Outdoors: 30 arrows (5 rounds) at 25 meters score 170 points on a 122 cm. target.
|
|
Note: The editors of this answer book feel that there is an error in the official version of this requirement. |
A standard "Olympic Bow" is a recurve (not compound) bow with no more than 3 stabilizer extensions, a sight, and a clicker. An archer must use fingers and not a mechanical release and may not have a string peep sight or magnified aiming device.
We have recommended that the NAD waive the scoring requirements for the "Beginning" archery honor. Everyone should be able to get this honor regardless of athletic skills. We have been given approval to grant the honors this way. That is what allowed us to teach over 1,000 pathfinders this honor at the Faith on Fire Pathfinder Camporee in Oshkosh, Wisconsin in 2004.
9. Know and practice the archery safety rules.
- Don't shoot straight up.
- Never run on the archery range.
- Approach the target from the side, not the front so you don't get poked by the arrows sticking out of the target.
- Be sure your equipment is in good working order.
- Be aware of who is around you at all times.
- Don't "hide" behind the target.
- Don't walk in front of another archer.
- Don't talk on the shooting line.
- While loading your bow be sure that the arrows are always pointing toward the target.
About the Author

Mark West

The West Family
The material for this chapter was provided by Mark West, owner and operator of West's Archery which was established in 1937 by his grandfather. Mark's father, Bill was a National Champion and 2-time World Champion. Mark has been an archer since 1969 and an instructor since 1973. He competed in the Olympics in 1972 and was the U.S. National Champion and 3-time California State Champion. He has travelled the world teaching archery skills and performing in programs with his "Gospel Archery" sharpshooting team. In 2004 at the Faith on Fire Camporee in Oshkosh, Wisconsin, Mark not only set a Guinness World Record by shooting a single arrow through eleven "handheld" balloons, but he and the West family also taught the Archery honor to over 1000 Pathfinders.
Adventist Youth Honors Answer Book/Recreation/Abseiling
Adventist Youth Honors Answer Book/Recreation/Abseiling
| Abseiling | ||
|---|---|---|
| Recreation South Pacific Division See also Abseiling - Advanced |
Skill Level Unknown | |
| Year of Introduction: Unknown | ||
Safety
1. a. List and explain the safety rules
1. b. Explain the “dangers of falling” chart.
2. Explain the uses of the following knots:
a. Tape
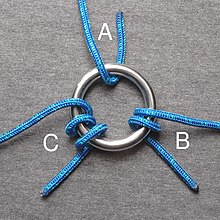
| Ring Bend (Water Knot, Tape Knot) |
|---|
|
Use: The water knot (or tape knot)
is a knot frequently used in climbing for joining two ends of webbing
together, for instance when making a sling. The ends should be left at
least three inches long and the knot should be "set" by tightening it
with full body weight. The ends can be taped or lightly sewn to the
standing parts to help prevent them from creeping back into the knot.
Inspect the knot before each use.
How to tie:
|
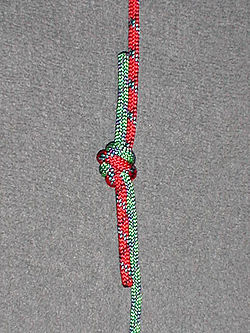
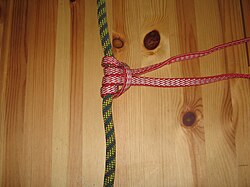
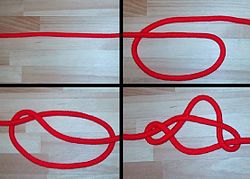
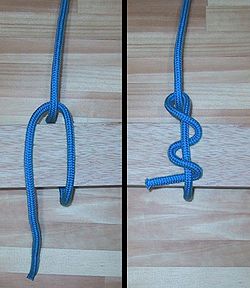
b. Alpine butterfly
| Alpine butterfly |
|---|

|

Use: The Butterfly Loop has a high
breaking strength and is regarded by mountaineers as one of the
strongest knots to attach climbers to the middle of a rope, such that
they have room to move around even when the main rope goes tight, and
they can be supported in either direction from the main rope. The loop
is typically attached to a climbing harness by carabiner. It can also be
used to isolate a worn section of rope, where the knot is tied such
that the worn section is used for the center of the loop.
|
c. Figure of eight loop
| Figure Eight |
|---|

|
Use: This knot is ideal for keeping the end of a rope from running out of tackle or pulley.
How to tie:
|
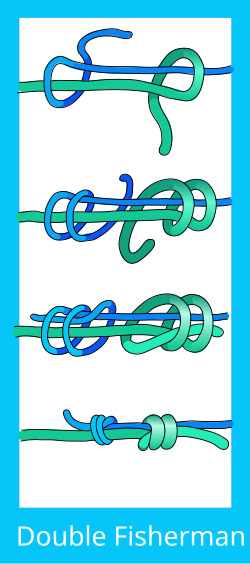
d. Double fishermans
| Double Fisherman's Knot |
|---|
|
Use: Joining thin, stiff or slippery
lines, backing up critical knots such as the Figure-of-eight loop or
Figure-of-eight follow through.
Use the double fisherman's knot to tie together two ropes of unequal
sizes. This knot and the triple fisherman's knot are the variations used
most often in rock climbing, but other uses include search and rescue.
The primary use of this knot in rock climbing is to form high strength loops of cord for connecting pieces of the rock climber's protection system. It is favoured for being compact, and for arranging the line of force in a straight line through the knot. Another common use for this knot is to back up a critical knot, such as a harness tie-in knot or single-line rappel rigs. In this use, the running end is tied around the standing end of the rope, so that it cannot slip back through the knot.
How to tie:
|
e. Prussik
| Prusik knot |
|---|
|
Use: A Prusik (aka Prussik or Prussic)
is a friction hitch used in climbing, canyoneering, caving, rope rescue
and by arborists to grab a rope (sometimes referred to as a rope-grab). The term Prusik is used both for the knot, for the loops of cord, and for the action (to prusik).
A Prusik rope is a circular loop with a circumference of 20 to 100 cm
Prusiks will work around two ropes, even two ropes of different diameters. Prusiks provide a high-strength and relatively fail-safe (i.e., they will slip before damaging the rope or breaking) attachment, and are used in some rope-rescue techniques. Prusiks are good to use in hauling systems where multiple rope-grabs may be needed, and where mechanical rope-grabs are not available. Although the Prusik Climb technique may be called old-school by some, the US Army still includes it in its annual Best Ranger competition. Rangers in the competition routinely make it up a 90 foot rope in under a minute.
How to tie:
The Prusik is tied by wrapping the prusik loop around the rope a number of times (depending on the materials, but usually 3-5 times), and then back through itself, forming a barrel around the rope, with a tail hanging out the middle. When the tail is weighted the turns tighten around the main rope and grab. When weight is removed the loop can be slid along the rope by placing a hand directly on the barrel and pushing. The trick is, if it grabs well, then it is hard to slide along the rope. Breaking the Prusik free from the rope after it has been weighted can be difficult, and is easiest done by pushing the bow, being the loop of cord which runs from the top wrap, over the knot to the bottom wrap, along the tail a little. This loosens the grip of the hitch and makes movement easier.
|


f. Bowline
| Bowline |
|---|

|
Use: This knot doesn't jam or slip
when tied properly. It can be tied around a person's waist and used to
lift him, because the loop will not tighten under load. In sailing, the
bowline is used to tie a halyard to a sail head.
How to tie:
|
Setup
3. Draw the diagrams for the setting up of the following abseil descents:
a. Single rope technique
b. Canyoning setup
4. Know the ways to identify safe anchors in various circumstances, e.g. trees, boulders, bollards. Belaying
5. Explain the various verbal calls.
6. Explain the principle of belaying and the three methods used, and give the advantages and disadvantages of each method:
a. Body belay
b. Mechanical belay
c. Base belay
Care of Equipment
7. List the rules for care of ropes.
Adventist Youth Honors Answer Book/Knot/Care Of Rope8. Explain the difference between dynamic and static rope.
Dynamic rope is usually used for climbing activities where stretch to absorb the shock from a leader fall while on belay or climbing while roped with a team is expected. The dynamic function decreases deceleration injury and preserves the rope. After hard falls ropes may need to be retired from leader use.Static ropes are built with little or no stretch. They are best suited for caving, Abseiling and static safety tied ropes.
9. Know the right type of equipment needed for abseiling.
Personal Protective Equipment (PPE)A helmet will protect your head from falling rocks or other impacts. Here is what you should look for. Light weight Well ventilated Fits comfortably on your head and you can forget you’re even wearing soon after you put it on. Always wear a helmet.
A harness. A wide padded waist belt harness with loops for carrying gear is good. Tape harnesses are ample but not very comfortable. The harness must be fitted correctly...it should be fitted firmly above the hips around the waist first, then leg loops should be adjusted firmly. There should be no pressure spots, wedging or chaffing from quality harness.
Gloves. Novices such as school groups who do abseiling only while on an instructors safety belay will usually use gloves. Their hands are soft and easily blistered and as a beginner they tend to get rope burn by letting the rope loose then grasping it in fear or excitement. Choose gloves that fit your hand size, and not the one size fits all type garden variety. The perfect glove is a mitten type with padded palms and exposed fingers.
Footwear. Climbing shoes are not necessary but sturdy footwear is recommended.
Ropes...
Belay devices...
10. Know the best way to store your ropes, e.g. coiling and chaining.
Be aware that moisture, extreme temperatures Ultraviolet light, chemicals, abrasion and dirt can all damage ropes. Keeping them clean, dry and protected is mission critical to a full lifespan of the rope.Descenders
11 a. Know which descending device to use in different abseils.
11 b. Give reasons why you chose that device, e.g. on/off time, security, heat, versatility, etc.
First Aid
12. Know about how to treat a patient for the following injuries:
a. Sprains
Adventist Youth Honors Answer Book/First aid/Sprainsb. Concussion
Adventist Youth Honors Answer Book/First aid/Concussionc. Hypothermia
Hypothermia is caused by continued exposure to low or rapidly falling temperatures, cold moisture, snow, or ice. Those exposed to low temperatures for extended periods may suffer ill effects, even if they are well protected by clothing, because cold affects the body systems slowly, almost without notice. As the body cools, there are several stages of progressive discomfort and disability. The first symptom is shivering, which is an attempt to generate heat by repeated contractions of surface muscles. This is followed by a feeling of listlessness, indifference, and drowsiness. Unconsciousness can follow quickly. Shock becomes evident as the victim’s eyes assume a glassy stare, respiration becomes slow and shallow, and the pulse is weak or absent. As the body temperature drops even lower, peripheral circulation decreases and the extremities become susceptible to freezing. Finally, death results as the core temperature of the body approaches 80°F (27°C). The steps for treatment of hypothermia are as follows:- Carefully observe respiratory effort and heart beat; CPR may be required while the warming process is underway.
- Rewarm the victim as soon as possible. It may be necessary to treat other injuries before the victim can be moved to a warmer place. Severe bleeding must be controlled and fractures splinted over clothing before the victim is moved.
- Replace wet or frozen clothing and remove anything that constricts the victim’s arms, legs, or fingers, interfering with circulation.
- If the victim is inside a warm place and is conscious, the most effective method of warming is immersion in a tub of warm (100° to 105°F or 38° to 41°C) water. The water should be warm to the elbow - never hot. Observe closely for signs of respiratory failure and cardiac arrest (rewarming shock). Rewarming shock can be minimized by warming the body trunk before the limbs to prevent vasodilation in the extremities with subsequent shock due to blood volume shifts.
- If a tub is not available, apply external heat to both sides of the victim. Natural body heat (skin to skin) from two rescuers is the best method. This is called “buddy warming.” If this is not practical, use hot water bottles or an electric rewarming blanket. Do not place the blanket or bottles next to bare skin, however, and be careful to monitor the temperature of the artificial heat source, since the victim is very susceptible to burn injury. Because the victim is unable to generate adequate body heat, placement under a blanket or in a sleeping bag is not sufficient treatment.
- If the victim is conscious, give warm liquids to drink. Never give alcoholic beverages or allow the victim to smoke.
- Dry the victim thoroughly if water is used for rewarming.
- As soon as possible, transfer the victim to a definitive care facility. Be alert for the signs of respiratory and cardiac arrest during transfer, and keep the victim warm.
d. Broken bone
Splints An essential part of the first-aid treatment is immobilizing the injured part with splints so that the sharp ends of broken bones won’t move around and cause further damage to nerves, blood vessels, or vital organs. Splints are also used to immobilize severely injured joints or muscles and to prevent the enlargement of extensive wounds.Before you can use a splint, you need to have a general understanding of the use of splints. In an emergency, almost any firm object or material can be used as a splint. Such things as umbrellas, canes, tent pegs, sticks, oars, paddles, spars, wire, leather, boards, pillows, heavy clothing, corrugated cardboard, and folded newspapers can be used as splints. A fractured leg may sometimes be splinted by fastening it securely to the uninjured leg. Splints, whether ready-made or improvised, must meet the following requirements:
- Be light in weight, but still be strong and fairly rigid.
- Be long enough to reach the joints above and below the fracture.
- Be wide enough so the bandages used to hold them in place won’t pinch the injured part.
- Be well padded on the sides that touch the body. If they’re not properly padded, they won’t fit well and won’t adequately immobilize the injured part.
- To improvise the padding for a splint, use articles of clothing, bandages, cotton, blankets, or any other soft material.
- If the victim is wearing heavy clothes, apply the splint on the outside, allowing the clothing to serve as at least part of the required padding.
To secure the limb to the splint, belts, neckerchiefs, rope, or any suitable material may be used. If possible, tie the limb at two places above and two places below the break. Leave the treatment of other types of fractures, such as jaw, ribs, and spine, to medical personnel. Never try to move a person who might have a fractured spine or neck. Moving such a person could cause permanent paralysis. Don’t attempt to reset bones.
Forearm

Upper Arm
- NOTE
- Treatment of the fracture depends partly upon the location of the break.
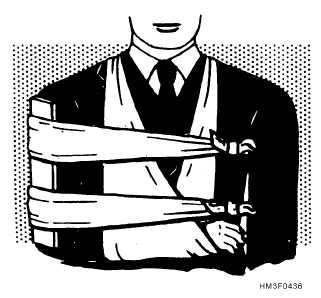
If the fracture is in the middle of the upper arm, you can use one well-padded splint on the outside of the arm. The splint should extend from the shoulder to the elbow. Fasten the splinted arm firmly to the body and support the forearm in a narrow sling, as illustrated.
Another way of treating a fracture in the middle of the upper arm is to fasten two wide splints (or four narrow ones) about the arm and then support the forearm in a narrow sling. If you use a splint between the arm and the body, be very careful that it does not extend too far up into the armpit; a splint in this position can cause a dangerous compression of the blood vessels and nerves and may be extremely painful to the victim. If the fracture is at or near the elbow, the arm may be either bent or straight. No matter in what position you find the arm, DO NOT ATTEMPT TO STRAIGHTEN IT OR MOVE IT IN ANY WAY. Splint the arm as carefully as possible in the position in which you find it. This will prevent further nerve and blood vessel damage. The only exception to this is if there is no pulse on the other side of the fracture (relative to the heart), in which case gentle traction is applied and then the arm is splinted. Treat the victim for shock and get him under the care of a medical professional as soon as possible.
Kneecap

Ankle

e. Shock
Shock is a medical condition where the delivery of oxygen and nutrients is insufficient to meet the body's needs. The main carrier of oxygen and nutrients in the body is the blood, so anytime there is a loss of blood, there is a risk of shock. Shock is a life-threatening emergency.
Recovery position
- Immediate reassurance and comforting the victim if conscious.
- If alone, go for help. If not, send someone to go for help and someone stay with the victim.
- Ensure that the airway is clear and check for breathing. Place the victim in the recovery position if possible.
- Attempt to stop any obvious bleeding.
- Cover the victim with a blanket or jacket, but not too thick or it may cause a dangerous drop in blood pressure.
- Do not give a drink. Moisten lips if requested.
- Prepare for cardiopulmonary resuscitation (CPR).
- Give as much information as possible when the ambulance arrives.
Cliff Rescue
13. Explain how to perform the following rescues:
a. The pulley system
b. The change-over method
SECTION TWO-PRACTICAL
1. Pass the abseiling exam with a pass mark of 60%. The exam is available from the conference youth ministries office, or through the instructor.
Verbal Testing
2. Answer the questions on the following topics:
a. Uses of the six abseiling knots
b. What are, and give the meaning of the standard climbing calls
c. Uses of various descenders
d. Give seven rules for are of rope
e. Give seven rules for safety
f. Know about first aid and how to treat patients
g. Give five ways to detect faults of ropes
Practical Testing
3. Perform the following tasks:
a. Tie the six knots
b. Set up the single rope setup and canyoning setup
c. Witness a cliff rescue demonstrated by the instructor
d. Coil and chain a rope
e. Set up the belay methods
Abseiling
4. From a minimum height of 10 meters, complete two abseils on each of the following devices, and know how to attach them to the rope:
a. Whale tail
b. Robot
c. Harpoon (easy access)
d. Figure of eight
e. Piton-brake bar
f. Rappel-rack
g. Harpoon (conventional)
h. Cross karabiner
5. Explain how to do the classic abseil, and over the shoulder abseil, for emergency use.
6. Be able to prussik a ten-meter cliff.
KNOT TIEING
It's a good idea to begin this honor with the definitions so your
Pathfinders have a working vocabulary of the various terms involved.
Telling them to "make a bight" or "take the standing part" makes little
sense until these terms are understood.

 Making rope requires some simple apparatus which you can make yourself easily enough. The first apparatus (we'll call it the twister)
is used for twisting three strands of twine (or smaller rope). When
making the twister, clamp the two boards that form the handles together
tightly and drill three holes through both at the same time. This will
ensure that they line up. The hook/crank portion of the twister can be
made from coat hanger wire. First make the two 90° bends in the center,
then pass them through the holes in the handles. Finally, form the hooks
on one end and the other 90° bend on the other. (This final bend
prevents the crank from slipping out of the holes in the handle).
Making rope requires some simple apparatus which you can make yourself easily enough. The first apparatus (we'll call it the twister)
is used for twisting three strands of twine (or smaller rope). When
making the twister, clamp the two boards that form the handles together
tightly and drill three holes through both at the same time. This will
ensure that they line up. The hook/crank portion of the twister can be
made from coat hanger wire. First make the two 90° bends in the center,
then pass them through the holes in the handles. Finally, form the hooks
on one end and the other 90° bend on the other. (This final bend
prevents the crank from slipping out of the holes in the handle).
As the strands are twisted, they will tend to grab one another and twist together. To make rope, this tendency has to be controlled. This is done with a second apparatus (we'll call it the separator). It consists of a board with three holes drilled in it, forming the points of an equilateral triangle. These points should be at least six inches away from one another, and should be large enough to pass the strands of twine through.
To make rope, cut three pieces of twine about 33% longer than the desired rope. Pass each strand through a hole in the separator, then tie a non-slip loop in the end of each (a figure-eight on a bight works well for this). We will call this end of the strands the free end. Slip these loops over a hook of some sort, and pull the strands straight. Bunch the ends opposite the loops together, and tie them off, again in a loop (and again, a figure-eight on a bight works well for this). We will call this end the bound end. Make sure that the three strands are the same length from one loop to the other. Hand the bound end to a helper, then attach the loops on the free end to the hooks on the twister. Pull the twister away from the bound end (still affixed firmly to another hook) until the strands are straight and tight. Then slide the separator towards the common end. Start cranking the twister so that the hooks rotate. As you crank, your helper will allow the three strands on his side of the separator to twist together. As they do this, the helper will slide the separator towards you, going only as fast as the strands bind to one another. Be careful to keep the strands tight as you do this so that they do not bind to one another on your end of the separator. Continue twisting until the separator reaches the twister. Then tie a knot in the free end of the rope, unhook it from the twister, and slide the separator off. Tie a stopper knot, or bind the end with tape. Then cut off the few inches of untwisted strand that remain (or make a back splice). Finish the opposite end in the same manner. Voila! You now have a rope!


The fisherman's knot is a bend (a knot for joining two lines) with a
symmetrical structure consisting of two overhand knots, each tied around
the standing part of the other. Other names for the fisherman's knot
include: angler's knot, English knot, halibut knot, waterman's knot.


A bight
- a. Bight
- The term bight refers to any curved section, slack part, or loop between the two ends of a rope,
- b. Running end
- Also called the working end, it is the free end of the rope. This is the end of the rope in which a knot is being tied.
- c. Standing part
- The part of the rope between the Running end and the Standing end (the end that doesn't move, think of it as if someone is holding it)
- d. Underhand loop
- A loop formed by passing the running end of a line under the standing part.
- e. Overhand loop
- A loop formed by passing the running end of a line over the standing part.
- f. Turn
-

- A turn is a component of a knot. Turns can be made around objects, through rings, or around the standing part of the rope itself. Turns come in various forms, distinguished by the number of passes that the rope makes. A turn or single turn requires one pass. The line makes a U-shape through or around the object, or half a revolution. A round turn requires two passes and makes one and a half revolutions. Two round turns adds another pass and revolution.A: Turn
B: Round turn
C: Two round turns
- g. Bend
- A bend is used to tie two ropes together, as in the Sheetbend. Technically, even the Reef knot is a bend
- h. Hitch
- A hitch is used to tie a rope to a spar, ring or post, such as the Clove hitch. Hitches can also be used to tie one rope ONTO another rope, as in the Rolling hitch.
- i. Splice
- A knot formed by interweaving strands of rope rather than whole lines. More time consuming but usually stronger than simple knots.
- j. Whipping
- A binding knot used to prevent another line from fray.
2. Know how to care for rope.
- a. Keep the rope clean.
- b. Always coil a rope before storing it.
- c. Make sure wet rope is dry before coiling it.
- d. Return rope to its proper place after using it.
3. Describe the difference between laid rope and braided rope and list three uses of each.
In laid rope, three bundles of fiber or twine are twisted in the same direction, placed close to each other, and allowed to twist together. In braided rope, the fibers are woven together, often around some core material.Uses of Laid Rope
- Repels water
- Able to withstand immense strain.
- Can be spliced with standard techniques.
Uses of Braided Rope
- Works well with pulleys and rigging.
- Spinning (lariats and lassos).
- Decorative knots.
4. Identify the following types of rope:
- a. Manila
- Manila is a type of fiber obtained from the leaves of the abacá (Musa textilis), a relative of the banana. It is mostly used to make ropes and it is one of the most durable of the natural fibers, besides true hemp. Manila is a coarse, brown fiber, about the same color and feel as a coconut shell.
- b. Sisal
- Sisal is valued for cordage use because of its strength, durability, ability to stretch, affinity for certain dyestuffs, and resistance to deterioration in saltwater. Sisal ropes and twines are widely employed for marine, agricultural (bailing twine), and general industrial use. Sisal fibers are smooth, straight and yellow and can be long or short.
- c. Nylon
- Nylon rope is often white, but any color is possible. It has a smooth, silky feeling to it, and it coils easily. Nylon rope does not float in water. It is a synthetic-fiber rope.
- d. Polypropylene
- Polypropylene rope is most often yellow, though any color is possible. It is often used in marine applications because it floats in water. The rope is sometimes difficult to tie as it is somewhat stiff and brittle. It is a synthetic-fiber rope.
5. What are some advantages and disadvantages of synthetic rope?
Advantages
- Improved abrasion-resistance
- Better UV-resistance
- Lighter
- Length does not vary as much when wet
- Rot-resistant
Disadvantages
- Some synthetics do not hold knots well
- More slippery
- Melts when heated
- Stretches more than natural ropes.
6. Do the following to rope:
a. Splice
A splice is used to join the ends of two ropes and results in the spliced part being about twice as thick as the non spliced part. The short splice retains more of the rope strength than any knots that join rope ends. It is tied using the same techniques as the eye splice (see below).b. Eye splice
| Eye splice |
|---|

|
Use: The eye splice is the
best method of creating a permanent loop in the end of multi stranded
rope by means of rope splicing. The ends of the rope are tucked
(plaited) back into the standing end to form the loop. Originally this
splice was described with each end being tucked only about three times.
When the splice was made in tarred hemp or cotton this was reasonably
safe. With modern synthetic ropes, five complete tucks is a minimum and
additional tucks are recommended for critical loads.
How to tie:
The ends of the rope are first wrapped in tape or heated with a flame to prevent each end from fraying completely. The rope is unlayed for a distance equal to three times the diameter for each "tuck", e.g., for five tucks in half inch rope, undo about 7.5 inches. Wrap the rope at that point to prevent it unwinding further. Form the loop and plait the three ends back against the twist of the rope. Practice is required to keep each end retaining its twist and lie neatly. |
c. Back splice
A back splice (also called an end splice) is a splice where the strands of the end of the rope are spliced directly back into the end without forming a loop. It is used to finish off the end of the rope to keep it from fraying. The end of the rope with the splice is about twice the thickness of the rest of the rope. Begin by unraveling the strands, and tie a crown knot. Then begin splicing the rope onto itself as with the short splice.d. Finish the end of a rope with a double crown, whipping, or a Matthew Walker's knot.
| Double crown knot |
|---|

|
Use: A double crown knot is a decorative knot tied on the end of a laid rope to prevent it from unraveling.
How to tie:
|
| Common whipping |
|---|
Use: The common whipping is
the simplest type of whipping knot, a series of knots intended to stop a
rope from unraveling. As it can slip off of the rope easily, the common
whipping should not be used for rope ends that will be handled. This
whipping knot is also called 'wolf' whipping in some parts of the world.
The benefit of a common whipping is that no tools are necessary and
the rope does not need to be unlayed. The problem is that it will slide
off the end of the rope with little provocation. Other whippings avoid
this by interleaving the whipping with the strands of the rope and
creating friction with the strands to avoid slipping.
Normally a natural fiber rope is whipped with twine. The size of the rope dictates the size of the twine. Any twine can be used, but tarred two strand hemp (marline) is preferred. Artificial-fiber ropes should have their ends fused by heat rather than whipped to prevent unraveling.
How to tie:
|
| Matthew Walker knot |
|---|

|

Use: A Matthew Walker knot is
a decorative knot that is used to keep the end of a rope from fraying.
It is tied by unraveling the strands of a twisted rope, knotting the
strands together, then laying up the strands together again. It may also
be tied using several separate cords, in which case it keeps the cords
together in a bundle.
How to tie:
A Matthew Walker knot is tied in a circular bundle of any number of strands. To tie the knot, the tier takes each strand and forms a loop around the rest of the bundle, then passes the end through the newly-formed loop to form an overhand knot. He then moves to the next strand over, moving around the bundle in the direction he passes the loops. Tying the first strand around the bundle is straightforward, but each subsequent end must be passed through the previously-formed loops in order to contain all of the other strands in its loop. When tightening, it may help to roll the knot along the bundle, especially when using only two strands. The final effect is a spiral knot vaguely resembling a section of a barber's pole. |
7. Make a six-foot piece of three-strand twisted rope from native materials or twine.

Rope-making apparatus
As the strands are twisted, they will tend to grab one another and twist together. To make rope, this tendency has to be controlled. This is done with a second apparatus (we'll call it the separator). It consists of a board with three holes drilled in it, forming the points of an equilateral triangle. These points should be at least six inches away from one another, and should be large enough to pass the strands of twine through.
To make rope, cut three pieces of twine about 33% longer than the desired rope. Pass each strand through a hole in the separator, then tie a non-slip loop in the end of each (a figure-eight on a bight works well for this). We will call this end of the strands the free end. Slip these loops over a hook of some sort, and pull the strands straight. Bunch the ends opposite the loops together, and tie them off, again in a loop (and again, a figure-eight on a bight works well for this). We will call this end the bound end. Make sure that the three strands are the same length from one loop to the other. Hand the bound end to a helper, then attach the loops on the free end to the hooks on the twister. Pull the twister away from the bound end (still affixed firmly to another hook) until the strands are straight and tight. Then slide the separator towards the common end. Start cranking the twister so that the hooks rotate. As you crank, your helper will allow the three strands on his side of the separator to twist together. As they do this, the helper will slide the separator towards you, going only as fast as the strands bind to one another. Be careful to keep the strands tight as you do this so that they do not bind to one another on your end of the separator. Continue twisting until the separator reaches the twister. Then tie a knot in the free end of the rope, unhook it from the twister, and slide the separator off. Tie a stopper knot, or bind the end with tape. Then cut off the few inches of untwisted strand that remain (or make a back splice). Finish the opposite end in the same manner. Voila! You now have a rope!
8. From memory tie at least 20 of the following knots and know their common uses and limitations. Demonstrate how they are used.
Anchor bend
| Anchor bend |
|---|

|

Use: The Anchor Bend is a knot used
for attaching a rope to a ring or similar termination. The round turn
and tight application help keep the rope from chafing.
How to tie:
|
Bowline
| Bowline |
|---|

|
Use: This knot doesn't jam or slip
when tied properly. It can be tied around a person's waist and used to
lift him, because the loop will not tighten under load. In sailing, the
bowline is used to tie a halyard to a sail head.
How to tie:
|
Bowline on a bight
| Bowline on a bight |
|---|

|
Use: This makes a secure loop in the middle of a rope which does not slip.
How to tie:
A bight is the middle part of the rope (not the ends)
|
Butterfly loop knot or Alpine butterfly knot
| Alpine butterfly |
|---|

|

Use: The Butterfly Loop has a high
breaking strength and is regarded by mountaineers as one of the
strongest knots to attach climbers to the middle of a rope, such that
they have room to move around even when the main rope goes tight, and
they can be supported in either direction from the main rope. The loop
is typically attached to a climbing harness by carabiner. It can also be
used to isolate a worn section of rope, where the knot is tied such
that the worn section is used for the center of the loop.
|
Carrick bend
| Carrick bend |
|---|

|
A fully interwoven diagonally opposed Carrick bend

Use: The Carrick bend is used for
joining two lines. It is particularly appropriate for very heavy rope or
cable that is too large and stiff to easily be formed into other common
bends. It will not jam even after carrying a significant load or being
soaked with water. The Carrick bend's aesthetically pleasing interwoven
and symmetrical shape has also made it popular for decorative purposes.
In the interest of making the Carrick bend easier to untie,
especially when tied in extremely large rope, the ends may be seized to
prevent the knot from collapsing when load is applied. This practice
also keeps the knot's profile flatter and can ease its passage over
capstans or winches.
The ends are traditionally seized to their standing part using a Round seizing. For expediency, a series of double constrictor knots, drawn very tight, may also be used. When seizing the Carrick bend, both ends must be secured to their standing parts or the bend will slip.
WARNING: The Carrick bend is
generally tied in a flat interwoven form shown above. Without additional
measures it will capsize (collapse) under load into a secure and
stable, although bulky, form. If the knot is allowed to capsize
naturally under tension, considerable slippage of line through the knot
can occur before tightening. The knot should be upset carefully into the
capsized form and worked up tight before actual use.
|
Cat's paw
| Cat's paw |
|---|

|
Use: The Cat's paw is used for connecting a rope to an object.
How to tie:
When using the cat's paw to join two eyes, this process may be repeated several times to give several turns - as many as five in a fine fishing monofilament. Then when tightened, instead of pulling the bight up against the turns, both eyes are pulled equally, to make neat coils of turns in both eyes, meeting halfway between them. |
Clove hitch
| Clove hitch |
|---|

|
Use: This knot is the "general
utility" hitch for when you need a quick, simple method of fastening a
rope around a post, spar or stake.
How to tie:
|
Constrictor knot
| Constrictor Knot |
|---|

|
Use: The Constrictor knot is one of
the most effective binding knots. Simple and secure, it is a harsh knot
which can be difficult or impossible to untie once tightened. It is made
similarly to a clove hitch but with one end passed under the other,
forming an overhand knot under a riding turn. It is a very effective knot for constructing a pilot's ladder, as it will not slip when tied around wooden rungs.
How to tie:
WARNING: The Constrictor knot's severe bite, which makes it so effective, can damage or disfigure items it is tied around.
|
Crown knot
| Crown Knot |
|---|
Use: Used a component in a back
splice and in the double crown knot. Can be used to temporarily prevent
the ends of a laid rope from unraveling.
How to tie:
|
Double bow
| Double bowline |
|---|

|
How to tie:
|
Double sheet bend
| Double sheet bend |
|---|

|
Use: The double sheet bend or double becket bend
is a strong knot used to tie two ropes (usually of different
thicknesses or rigidity) together. It is a doubled version of the sheet
bend.
How to tie:
To tie the double sheet bend, start by making a bight in the larger line. Pass the working end of the smaller line up through the bight, around behind the bight, and beneath the loop in the smaller line (that's a sheet bend). Then once again, pass the working end along the same path, around behind the bight and beneath the loop in the smaller line.
WARNING: As with the standard sheet bend, the two free ends should end up on the same side of the knot. If they do not, a left-handed double sheet bend results, which is much weaker.
|
Figure eight
| Figure Eight |
|---|

|
Use: This knot is ideal for keeping the end of a rope from running out of tackle or pulley.
How to tie:
|
Fisherman's bend
| Fisherman's knot |
|---|

|
Use: The Fisherman's knot is a
specialized bend. It consists of two overhand knots wrapped around each
other. It works well for joining thin, stiff, or slippery lines. It
requires little dexterity to tie, so is often used in stubborn
materials. When tightened, it becomes fairly compact, and the free ends
can be cropped very close to the knot. These qualities make it very
useful for fishing line--it is less likely to jam a fishing rod than
many other bends, and is easier to tie with cold, wet hands.
How to tie:
To tie the fisherman's knot, lay the two ends to be tied alongside each other and facing opposite ways. Tie an overhand knot on the first rope and pass the second rope through the loop formed. Tighten the overhand knot, to prevent the line inside it from flopping around. Then tie another overhand knot on the second rope with the first rope passing through it. |
Fisherman's loop
| Fisherman's loop |
|---|

|
Use: The fisherman's loop makes a non-slip loop at the end of a rope.
How to tie:
This knot is the same as a fisherman's bend, except that instead of joining two ropes together, a single rope is doubled over and then joined to itself forming a loop. Another way to tie it is to make a slip knot and then use the running end to tie an overhand knot around the standing end. |
Halter hitch
| Halter hitch, Hitching tie |
|---|
Use: The halter hitch, sometimes called a hitching tie
is used to tie the lead rope, which is attached to a horse's halter (or
to a boat), to a post or hitching rail. The benefit of the halter hitch
is that it can be released by pulling on one end of the rope. Even if
there is tension on the horse-side of the rope it can still be release
with ease.
How to tie:
|


Hunter's bend
| Hunter's bend |
|---|

|

Use: The Hunter's bend (aka Rigger's bend)
is used to join two lines. It consists of interlocking overhand knots,
and can jam under moderate strain. Hunter's bend is one of the most
recent knots to be discovered. It appeared on the front page of The Times
in 1978 and was credited to Dr. Edward Hunter. Dr. Hunter used it for
years to tie broken shoelaces before discovering its originality through
a friend in the 1970s. When it appeared on the front page, it led to
much publicity for the knot and also to the foundation of the
International Guild of Knot Tyers. However, the knot was presented in Knots for Mountaineering by Phil Smith ca. 1956.
|
Lariat or Bowstring knot
| Lariat |
|---|

|
Use: A lariat knot is the
loop knot commonly used in a lasso. Its round shape, especially when
tied in stiff rope, helps it slide freely along the rope it is tied
around.
How to tie:
|
Lark's head
| Lark's head |
|---|

|
Use: The lark's head is a
knot (specifically, a hitch). Also called a cow hitch, it comprises two
half-hitches tied in opposing directions. The cow hitch is often used to
connect loop-ended lanyards to handheld electronic equipment, since it
can be tied without access to the ends of the fastening loop.
How to tie:
When both the standing parts of the rope are available, the cow hitch can be tied in the following manner:
|
Man harness knot
| Man harness knot |
|---|

|

Use: The Man harness is a
knot with a loop on the bight for non-critical purposes. This knot is
used when multiple people are to pull a load. Typically one end of the
rope is tied to a load, and one man harness knot per puller will be tied
along its length. Each loop is then pulled by a different person.
How to tie:
WARNING: The Man harness knot must have the loop loaded or it will slip and contract easily.
|
Miller's knot
| Miller's knot |
|---|

|
Use: A Miller's knot (also Sack knot or Bag knot)
is a binding knot used to secure the opening of a sack or bag.
Historically, large sacks often contained grains; thus the association
of these knots with the miller's trade. Several knots are known
interchangably by these three names. Several variations are shown here.
|


Packer's knot
| Packer's knot |
|---|

|
Use: The Packer's Knot is a binding knot usually used in smaller line. This knot is sometimes used in baling and in parcel tying.
How to tie:
|
Pipe hitch
| Pipe hitch |
|---|

|
Use: The pipe hitch is used for hoisting tubular objects (such as pipes).
How to tie:
|
Prusik knot
| Prusik knot |
|---|

|
Use: A Prusik (aka Prussik or Prussic)
is a friction hitch used in climbing, canyoneering, caving, rope rescue
and by arborists to grab a rope (sometimes referred to as a rope-grab). The term Prusik is used both for the knot, for the loops of cord, and for the action (to prusik).
A Prusik rope is a circular loop with a circumference of 20 to 100 cm
Prusiks will work around two ropes, even two ropes of different diameters. Prusiks provide a high-strength and relatively fail-safe (i.e., they will slip before damaging the rope or breaking) attachment, and are used in some rope-rescue techniques. Prusiks are good to use in hauling systems where multiple rope-grabs may be needed, and where mechanical rope-grabs are not available. Although the Prusik Climb technique may be called old-school by some, the US Army still includes it in its annual Best Ranger competition. Rangers in the competition routinely make it up a 90 foot rope in under a minute.
How to tie:
The Prusik is tied by wrapping the prusik loop around the rope a number of times (depending on the materials, but usually 3-5 times), and then back through itself, forming a barrel around the rope, with a tail hanging out the middle. When the tail is weighted the turns tighten around the main rope and grab. When weight is removed the loop can be slid along the rope by placing a hand directly on the barrel and pushing. The trick is, if it grabs well, then it is hard to slide along the rope. Breaking the Prusik free from the rope after it has been weighted can be difficult, and is easiest done by pushing the bow, being the loop of cord which runs from the top wrap, over the knot to the bottom wrap, along the tail a little. This loosens the grip of the hitch and makes movement easier.
|


Sheepshank
| Sheepshank |
|---|

|
Use: The sheepshank knot is used to shorten a length of rope. It comes undone easily unless it is under tension.
WARNING: Keep this knot under tension or it will come untied.
|
Sheet bend
| Sheetbend |
|---|

|
Use: The sheet bend knot is
excellent for joining two ropes together, especially if the two ropes
are not the same size. When tied properly, it will not come undone, and
it is easy to untie. It is very similar to the bowline.
How to tie:
|
Slip knot
| Slip knot |
|---|

|
Use: A slip knot is one that will
tighten under load, and which can be easily untied by pulling on the
running end. This knot is typically a component of more complicated
knots, and is generally not used by itself.
How to tie:
A slip knot can be tied by starting an overhand knot, but instead of passing the running end through the loop, pass a bight through instead.
WARNING: If tied as shown in the
illustration, the running end (on the right) will pull through the loop
if even the slightest load is applied to the standing end (on the left).
If one reverses the standing end and running ends in the illustration,
the knot is far more stable. As shown, the knot will hold a load on the
running end, but not on the standing end.
|
Slipped half hitch
| Slipped half-hitch |
|---|

|
Use: A slipped half-hitch is a
knot used to attach a line to a rod or bar. It does not provide great
strength compared to some other knots, but it can be tied relatively
quickly and released very easily. These characteristics mean that it is
used on square-rigged ships for securing the gaskets that bind stowed
sails to the yards.
How to tie:
Begin as for a clove hitch, but instead of passing the end of the line through the loop in the final step, pass a bight instead, leaving the end on the original side. Pulling on this end will release the hitch - if tied in a gasket, this will quickly release the sail.
WARNING: Never use this knot in a critical situation. It comes untied at the slightest provocation.
|
Slipped sheet bend
| Slipped sheet bend |
|---|

|
Use: The slipped sheet bend is used in non-critical situations for temporarily joining two ropes.
How to tie:
Start the same as in tying a regular sheet bend, only pass a bight (light blue in the illustration) under the last rope (dark blue) instead of passing the running end under.
WARNING: The slightest tug on the running end will untie this knot instantly - even if the knot is under load.
|
Square knot
It is used for the Basic Rescue. ( See basic rescue honor)| Square Knot |
|---|

|
Use: Also known as a Reef knot, the
Square Knot is easily learned and useful for many situations. It is most
commonly used to tie two lines together at the ends. This knot is used
at sea in reefing and furling sails. It is used in first aid to tie off a
bandage or a sling because the knot lies flat.
How to tie:
WARNING: Do not rely on this knot to hold weight in a life or death situation. It has been known to fail.
|
Stevedore's knot
| Stevedore knot |
|---|

|
Finished stevedore knot

Stevedore knot before tightening
Use: The Stevedore knot is a
stopper knot, often tied near the end of a rope. It is more bulky and
less prone to jamming than the closely related figure-eight knot. This
knot is excellent for anchoring a tarp. Pass the end of the rope through
a tarp's grommet, tie a stevedore, and anchor the other end with a
taut-line hitch. Its added bulk prevents it from pulling through the
grommet.
How to tie:
The knot is formed by following the steps to make a figure-eight knot, but the working end makes an additional round turn around the standing part before the end passes back through the initial loop. |
Strangle knot
| Strangle knot |
|---|

|
Use: The Strangle knot is a
simple binding knot. Similar to the constrictor knot, it also features
an overhand knot under a riding turn. The difference is that the ends
emerge at the outside edges, rather than between the turns as for a
constrictor. This knot is actually a rearranged double overhand knot and
makes up each half of the double fisherman's knot. When tightened, it
is very slip-resistant. It is ideal for constructing a pilot ladder
(like a rope ladder, but with wooden rungs).
|
Surgeon's knot
| Surgeon's knot |
|---|

|
Use: The surgeon's knot is similar
to a square knot, except that the first stage is doubled. This helps the
knot stay tight while it is being tied.
|
Taut-line hitch
| Taut-line hitch |
|---|

|
Use: The Taut-Line Hitch
is an adjustable loop knot for use on lines under tension. It is useful
when the length of a line will need to be periodically adjusted in
order to maintain tension. It is made by tying a Rolling hitch around
the standing part after passing around an anchor object. Tension is
maintained by sliding the hitch to adjust size of the loop, thus
changing the effective length of the standing part without retying the
knot. When under tension, however, the knot will grip the cord and will
be difficult to cause to slip.
It is typically used for securing tent lines in outdoor activities involving camping, by arborists when climbing trees, for creating adjustable moorings in tidal areas, and to secure loads on vehicles. A versatile knot, the Taut-line hitch was even used by astronauts during STS-82, the second Space Shuttle mission to repair the Hubble Space Telescope.
How to tie:
|
Timber hitch
| Timber hitch |
|---|

|

Use: The timber hitch is a knot used to attach a single length of rope to a piece of wood. This knot is easily undone after use.
How to tie:
|
Two half hitches
| Two half hitches |
|---|

|
Use: This reliable knot is quickly tied and is the hitch most often used in mooring.
How to tie:
- Pass end of rope around post or other object.
- Wrap short end of rope under and over long part of rope, pushing the end down through the loop. This is a half hitch.
- Repeat on long rope below first half hitch and draw up tight.
Subscribe to:
Posts (Atom)